Showing posts with label Block of the Month. Show all posts

Tuesday, August 28, 2018

August 2018 Lottery Block: Fussy Cut Polaroid Block

August 2018 Lottery Block: Fussy Cut Polaroid Block
Due at the November 2018 Meeting


This month's block is brought to you be Christine Quirion

With this block, you’ll create “Polaroid” photo block to showcase interesting prints, fussy cut images, charm squares or tiny piecing in a photo style frame. Each Polaroid gets a gray outer frame, and the finished block illustrates 4 interesting Polaroid images.

Colors: All of the “picture” centers of your Polaroids should include dark/navy Blue. The images don’t have to be entirely blue, but a common thread of one color will tie the finished lottery blocks together. The four Polaroid blocks that you sew together should relate to one another visually or thematically.

Fabric Requirements for completed 4-Polaroid Block:
  • Four 3.5 x 3.5 squares for center images of Polaroids that contain the color dark Blue 
  • ⅛ yard of white 
    • 1 inch WOF (width of fabric) strips for tops and sides of each Polaroid frame 
    • 1.5 inch WOF for bottom of each Polaroid frame 
  • ¼ yard of gray fabric for outer frame 
    • 2 inch WOF strips 
Based on this tutorial, there are no changes to the dimensions or instructions:

http://emeraldcoastmodernquiltguild.blogspot.com/2014/04/may-2014-block-lottery-polaroid-4x4.html

Cutting:
  • White (Kona white or similar) 
    • 1 inch WOF (width of fabric strips for tops and sides of each Polaroid frame 
    • 1.5 inch WOF for bottom of each Polaroid frame 
  • Gray (Kona Medium Gray or similar) 
    • 2 inch WOF strips 

Subcut: into 8 strips of 2 X 8.5 and 8 strips of 2 x 4.5

Trimming sizes (from tutorial link above):
  • Trim each Polaroid including gray outer frame to 6.5 inches square 
  • Trim each 4-Polaroid Block to 12.5 inches square 
Note: Is OK if one or more individual Polaroid centers are set wonky as you trim. The images are the star and wonkiness can help blocks made by different people go together for the lottery winner.

Example finished 4 Polaroid block trimmed to 12.5 inches using the Emerald Coast MQG tutorial:


Sunday, June 24, 2018

June 2018 Lottery Block

June 2018 Lottery Block

The lottery block is due at the August Meeting and is brought to you be Rebecca Sachs

Here is the tutorial! 

The blocks should be at 7.5" finished (8" with seam allowance) 

Colors: 
Center edge: Black solid or black patterned fabric.
Triangle bits: White or very low volume white fabric
Center Cross and Corner X's: Mix of bright citrus colored fabrics - Yellow, Green, Orange, Coral, Pink, & Red!  The the types of colors on this page would all be great (http://colorpalettes.net/tag/color-of-citrus/) 

This is just an example of the block and does not have the correct colorwary:


Sunday, April 29, 2018

April 2018 BOM - Something Fishy

April 2018 Something Fishy 
Due at the June 2018 Meeting 


This block is brought to you by Jen McPhilimy. 


1.) Pick your fabrics. 
Water: Teal - Use a solid, batik, or pattern that reads as a solid, so long as it's teal!
Fish: Anything goes!

2.)  Make fish body. 
Cut one 3 1/2" square for the body of the fish. This can be a single fabric or pieced. (fish can have stripes, spots, color blocking, side fins, etc.)

3.) Make tail and fins.
Cut three 3 1/2" squares of the water fabric. Add a triangle of the fish fabric to create the tail and fins. Try different size, shapes, or angles. (You may find it easier to start with a 4" square then trim down to 3 1/2" after adding the tail or fin.)


4.) Assemble your fish. 
Sew the body, tail, and fin squares together into a four patch.

5.) Give the fish room to swim. 
From a 2" strip of water fabric, cut two 6 1/2" pieces and two 9 1/2" pieces and add to each side of the four patch.

6.)  Done!
The lottery blocks you turn in should measure 9 1/2" x 9 1/2". (That's a 9 - inch final block with a 1/4-inch seam allowance.)


Sunday, September 24, 2017

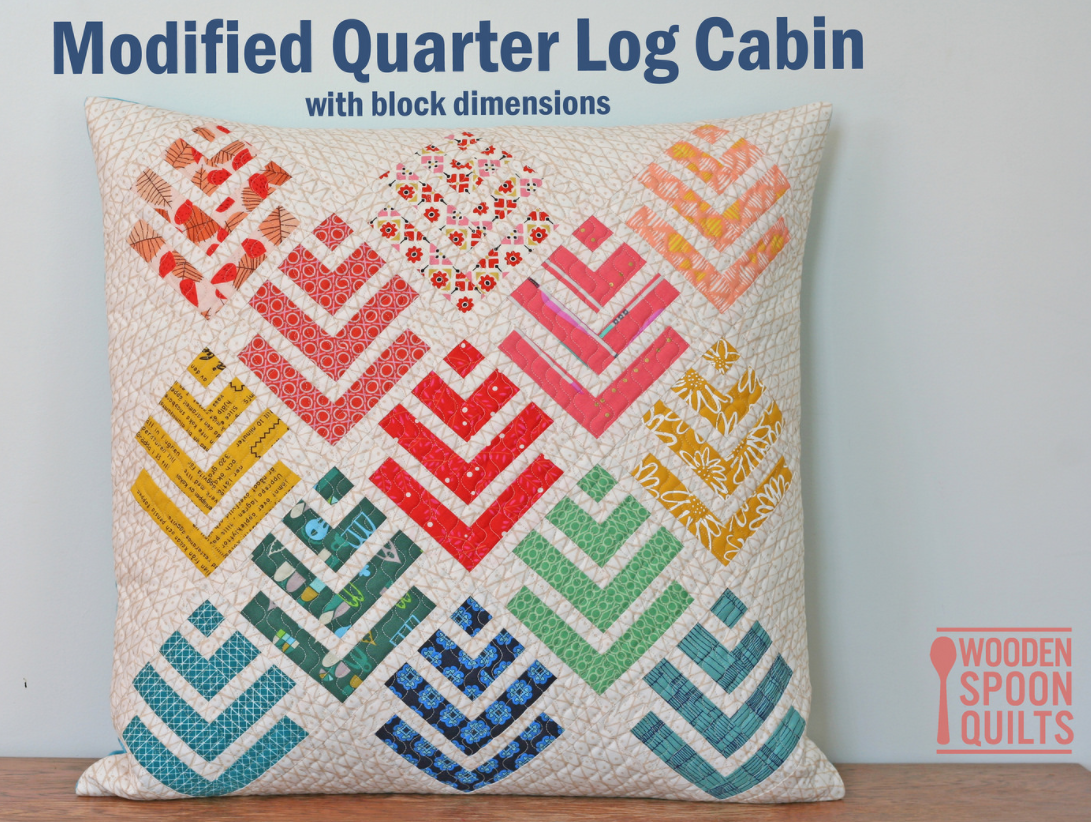
Sept 2017 BOM - Modified Quarter Log Cabin

Block of the Month – September 2017
Brought to you by Laurie Bock

Since we all seem to love fun patterns on the diagonal, our block of the month is the Modified Quarter Log Cabin block by Wooden Spoon Quilts.

THIS BLOCK HAS BEEN SCALED UP TO FINISH AT 8.5 INCHES (9 INCHES UNFINISHED). Follow these instructions for cutting.

Due at the November 2017 Meeting

Original pattern here : http://woodenspoonquilts.blogspot.com/2016/05/a-pillow-and-tutorial.html


Main color: Bright pattern colors

Background: low volume whites/ beiges

Note: If you do not wish to sub-cut the strips, simply sub-cut cut the starting and ending pieces and cut pieces as you sew.


Step 1: Cut one strip of 2 ¼ in x WOF of the colored fabric. Sub-cut this strip into 2 ¼, 2 ¾, 4 ½, 5, 5 ½, 6 ¾, 7 ½ pieces.

Step 2: Cut two 2 ¼ inch squares and a 1 in x WOF strip from the background fabric. Sub-cut the strip into 2 ¼, 2 ¾, 4 ½, 5, 6 ¾, 7 ¼ inch pieces.

Step 3:
Start with the 2 ¼” square of colored fabric. Sew the smallest background strip to the left of this fabric square, then sew the second smallest background strip to the top of this pieced unit.

Step 4: Add the main fabric strips, on the left of the pieced unit, then the top of the pieced unit.

Step 5:
Continue alternating adding background and main fabric strips.

Step 6: Before adding the last round of strips, sew the background squares to the main fabric strips.